Lesson 1: Lab Fundamentals I
Measurement in the Laboratory
Since chemistry is a new situation for you let me explain what is expected of you when you make and record measurements. Write down measured values to the same degree of precision with which you measure them.
In general, I expect that you will make and record your measurements to a precision that involves estimating between the closest lines on the scale. Practice doing this is available on the other page in this section.
Aspects of Measurements
There are four important aspects of measurement. First is the property of the material or sample that you are measuring. For example, are you measuring how much space it takes up (volume) or how heavy it is (weight)? Units, such as liters and pounds, are used to denote the property being measured.
The second aspect of measurement is size. How big is the value that you are measuring? That is usually dealt with in two parts: how big the number is and what units were used. You need to show the units used in making the measurement. If all you know is that something weighs 13, you really don't know very much. Is it 13 grams, 13 milligrams, 13 pounds, or what?
Third, you want the value that you measure to be accurate. If you are weighing something that has a mass between 4 and 5 grams, you want your value to be four-point-something grams, not seven-point-something grams. Accuracy involves using the proper measuring device and using it correctly.
Fourth, you need to show how precise the measurement is. For example, did you measure to the nearest tenth, hundredth, or thousandth of a gram? One way to indicate precision is with significant digits.
In summary, when you make measurements, you need accuracy, precision, size (including units), and property (also included in units). You will be expected to use accuracy, precision, and units in each measurement that you make. This section deals with the issues and skills associated with actually making measurements with the proper precision. Later sections will deal with the specifics in making different types of measurements (mass, volume, and temperature).
Practice Reading Between the Lines |
Significant Digits - Measured Values You Write |
Practice Reading Between the Lines
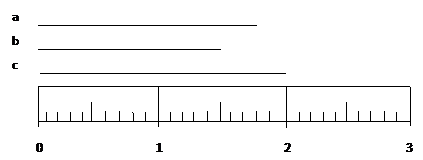
Take a look at Example 23 in your workbook to look at some length measurements. (These examples will also be shown on-line but may be distorted due to digital reconfiguration.) The scales shown here are arbitrary, so we will just work with the numbers and not with the units.
Take a look at the lines drawn above each scale. If you can measure each of the lines shown in the workbook and get the same value that is shown below the scale, feel free to move on to the next topic. If you want additional explanation of these measurements, continue with the examples shown below.
Example 2 - parts a, b, c.

On this scale the numbers mark 1, 2 and 3 units. Each numbered division is divided into 10 parts, so each marked division is 0.1 unit. You are expected to read between the lines, so you need to report measurements to 0.01 unit. This is not hard but it is important.
Look at line a. It extends past the 1.8 mark on the scale. By my estimate it goes to 1.84 so that is what I would write down. You might see it the same way or estimate it at 1.83 or 1.85. Either of those would be a reasonable measurement.
Line b presents a bit of a problem. It extends to the 1.5 mark on the scale and no further. I could write down 1.5 but I'm supposed to read between the lines. Since it seems to me to line up with the mark I would write 1.50. That gives the measurement to the nearest 0.01 unit or says that the measurement is right on the line as far as I can tell. In this situation that 0 is a measured value and should be included in the measurement.
Line c is somewhat similar to line b. Here the length of the line matches a numbered mark. So I needed to put in two 0's in order to show that the measurement was measured to 0.01 unit.
Also note that I didn't extend any of these numbers by using any extra unmeasured digits. When dealing with precision, 1.50 does not mean the same thing as 1.500. When writing down a measurement, put down all measured numbers including the estimate between the lines, or zero if on the line, but no more. A quick rule-of-thumb would be to note the smallest divisions on the measuring device (in this case, 0.1) and then record one place past that (in this case, to the hundredths place). Your final digit, whether it is a zero or a non-zero digit, is an estimated digit; however, it is considered a "known" digit because it is reasonable to estimate between the lines. Once you have one estimated digit, you wouldn't want to keep going - you'd be overstating the precision of your measuring device then.
Example 2 - Parts d and e.

On this scale, the numbers mark 10, 20 and 30 units. Again each numbered division is divided into 10 parts, so each mark is 1 unit. Since we read between the lines, measurements should be made to 0.1 unit. Thus line d is 14.3 rather than 14 or 14.30. Occasionally in cases like this, people will forget that each mark is 1 unit instead of 0.1 unit and read the length as 10.43. Try to avoid that mistake if you can.
Line e measures at more than 20 and less than 21 and is estimated to be 20.8. Be careful to note that the value is 20.8 and not 28.
Before going on to the next scale I would like you to review the correct and incorrect values given in the workbook for each of the lines a-e. You should be able to say what is right and wrong about each of those values. If you have any trouble check with your instructor to get squared away.
Example 2 - Parts f and g.

On this scale the numbers mark 1000, 2000 and 3000 units. Each numbered division is divided into 10 parts, so each marked division is 100 units. Since we can read between the lines the measurements can be made to a precision of 10 units.
Line f extends more than 7 marks (but less than 8 marks) past 1000. So its length is between 1700 and 1800. We can estimate between the marks to get 1720. Note that even though there is a zero at the end of this number it was never measured. We couldn't get that much precision from this scale. It is there to show size (1720 rather than 172) but not precision (1720 rather than 1721 or 1718). There are ways of dealing with this dilemma. Most important right now is that you recognize it as a dilemma, that properly showing the precision of a measurement is important enough that that "extra" zero is a problem.
Line g extends to the 500 mark but not beyond, so I would write 500 rather than 490 or 510. Because this scale allows a precision of +10 units, the zero in the ten's place is a measured (estimated) digit. Note that the one's place has not been measured. Measuring line g creates the additional problem of having one zero that does measure precision and another one that does not. Study the examples of lines f and g to make sure that you understand which digits (especially zeros) represent measured values and which zeros are placeholders.
Example 2 - Parts h and i.

On this scale the numbers mark 0.1, 0.2, and 0.3 units. Each division represents 0.01 units. By reading between the lines we should be able to make measurements with a precision of 0.001 units.
The problem with lines h and i is that they are smaller than even the first number on the scale. Because of this our measurements are going to have leading zeros.
Line h is less than 0.1 units so it will be 0.0 something. It extends past the fifth mark so it is 0.05 something. I estimate it to be seven tenths of the way to the next mark so its length is written as 0.057 units.
Line i not only doesn't make it to the first number, it doesn't even make it to the first mark so its length is less than 0.01. I estimate it to be 0.008 units.
Significant Digits - Measured Values You Write
|
a = 1.84 b = 1.50 c = 2.00 |
Let's go back over the measurements in Example 23. In this first group, three digits were measured so each measurement contains three significant digits, zeros included. |
|
d = 14.3 e = 20.8 |
In the second group, again three digits were measured so each measurement contains three significant digits. |
|
f = 1720 g = 500 |
With line f the 1, 7 and 2 were measured. The 0 is a decimal place holder. Three digits were measured so this measurement has three significant digits. With line g the 5 and the first 0 were measured. The second 0 is a decimal place holder. Since two digits were measured, this measurement contains two significant digits. |
Vernier Scales
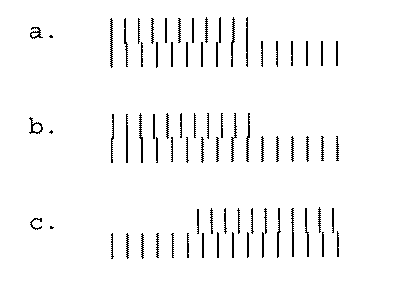
Let's get back to estimating between the marks while making measurements. Back in 1631 a French mathematician named Pierre Vernier developed a way of making those estimates more reliable. That method is called a Vernier scale, as shown in Example 24 in your workbook. In parts a, b and c, the Vernier scale is on top and the standard scale is on the bottom. (Note: Due to scanning and digital reconstruction of the following analog diagrams, many of the lines are dashed or have dashed attachments. It is the position of these lines and not their appearance that is important in the following discussion. This technical difficulty can be avoided by using the diagrams in Example 24 of your workbook.)


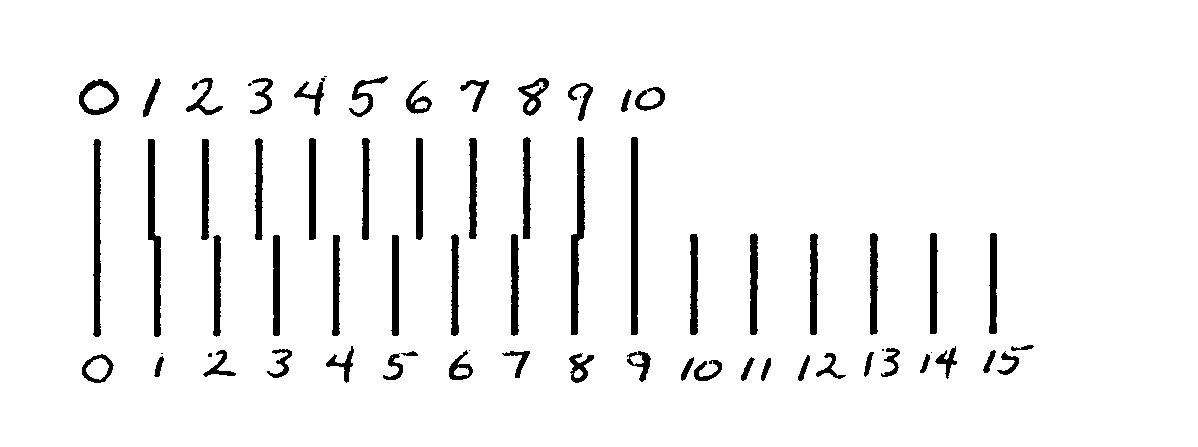
In the simplest form 10 units on the Vernier scale equal 9 units on the Standard scale. I have numbered the top sequence of lines from 0 to 10, and I have numbered the bottom sequence of lines from 0 to 15. Notice that with the 0 marks on both scales lined up, the 10th mark on the Vernier scale lines up with the 9th mark on the Standard scale.
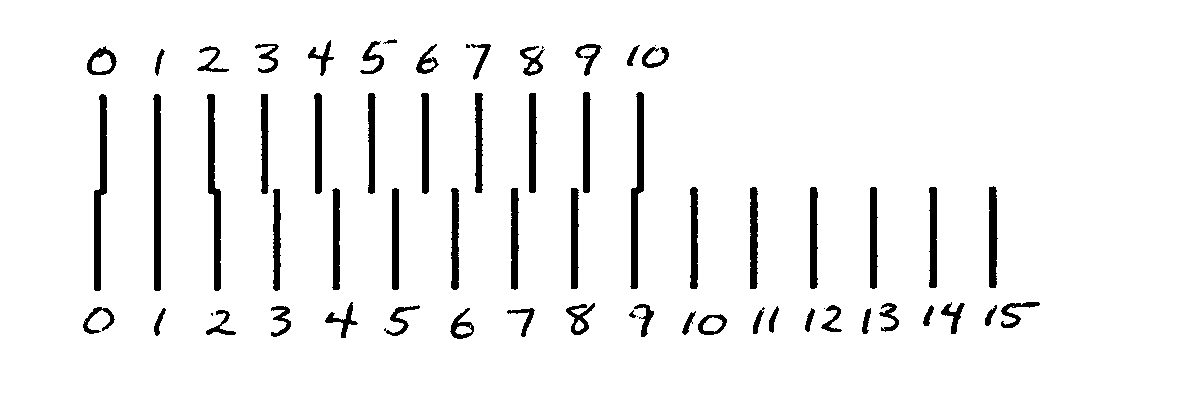
 Notice what happens in part b when the
Vernier scale is shifted slightly. I would estimate that the 0-mark on the Vernier scale
is one-tenth of the way between the marks on the Standard scale. The Vernier scale
confirms this because the number 1 mark on the Vernier scale lines up with a mark below it
on the Standard scale. If the 0-mark on the Vernier scale is slid two-tenths of the way
over to the next Standard mark, then the number 2 mark on the Vernier scale would line up
with a mark below it on the Standard scale. Note that however far the Vernier scale
slides, the position of the 0-mark of the Vernier scale will be indicated by the number of
the Vernier mark that lines up with a mark on the Standard scale. How that works might be
apparent to you. More likely, you will want to look at and manipulate the sample we have
in the lab.
 Now look at part c. Let's figure out the
position of the Vernier-0-mark on the Standard scale. It is between the 5th and 6th marks
so it is at five-point-something, maybe 5.7 or 5.8. By noting that the number 7 mark on
the Vernier scale lines up with a mark on the Standard scale, we know the reading should
be 5.7. If you have any questions about this see an instructor. You will be using a
modified Vernier scale in the lab when you use a Dial-O-Gram balance.
In the next section, we'll get into how you actually make some of these measurements you've been reading about.